Auto gear box - clunking by Bermudan 75 (Page 3 of 4)


User avatar
Mick
(Site Admin)
That would be an excellent addition to the diagnostic arsenal.

Posted 03 Feb 2012, 20:08 #41 

User avatar
raistlin
Rover418275 wrote:Ah have got you now, you mean a tester to check out the solenoids?


Yes, noddy's guide red or green LED (Light Emitting Diode) with a resistance meter to evaluate out of range readings.
Paul

Cogito ergo sum... maybe?

Click the image to go to Nano-Meet Website
Image

Posted 03 Feb 2012, 20:28 #42 

User avatar
takestock
Are we not inventing what already exists? Multimeter ( with cellophane removed from battery ) Placed on the correct pins as per diagram in this thread and read the multimeter? apologies if I am missing something.

Edit: Or are we looking at the car part of the harness scavenged from an old car and linked up to some of Paul's electricery so you just plug an light up?
Photobucket = Tossers

Dave....

Posted 03 Feb 2012, 20:42 #43 

User avatar
raistlin
takestock wrote:Are we not inventing what already exists? Multimeter


Possibly so Dave, but then again, some of us aren't even sure how to take the cellophane off the battery ;)
Paul

Cogito ergo sum... maybe?

Click the image to go to Nano-Meet Website
Image

Posted 03 Feb 2012, 20:46 #44 

User avatar
Bermudan 75
raistlin wrote:
takestock wrote:Are we not inventing what already exists? Multimeter


Possibly so Dave, but then again, some of us aren't even sure how to take the cellophane off the battery ;)


Somehow I am begining to get the impression that I will not be allowed to forget this :em:

But getting back to my earlier post, do I need to disconnect battery and gasket sealent?
Image

Posted 03 Feb 2012, 22:35 #45 


PaulT
My idea was that you remove the plug from the gearbox and plug in a lead made using a plug taken from a scrap vehicle. This is wired to a box of tricks that has a red and green LED for each solenoid so at a glance you will see which are OK (green LED) and which are not (red LED). A button alongside each pair of LEDs could then be pushed if the LED is showing red to show the actual resitance reading.
Paul

That apart Mrs Lincoln, did you enjoy the play

Image

Posted 04 Feb 2012, 09:01 #46 

User avatar
takestock
Right. Workshop manual always recommends disc battery, your call.
Instructions for removing "fluid pan"

Release clips securing the two gearbox harness multiplugs to the pan and move aside

Remove the 21 bolts securing the pan to the gearbox and remove the pan.

To refit:
Clean pan and gearbox mating surfaces and apply liquid gasket to the surfaces, fit pan and tighten bolts to 7NM

Make sure you change the correct sol there are 9 seemingly. I THINK it is the second one up on the passenger side, but only from reading about it. Struggling to find a picture as the host has removed them :(
Photobucket = Tossers

Dave....

Posted 04 Feb 2012, 09:24 #47 

User avatar
Bermudan 75
Thanks Dave, now all I need is for this snow to hold off........ :-o
Image

Posted 04 Feb 2012, 09:28 #48 

User avatar
takestock
Image

Definately 2nd one up on pass side , white wire, white connector. for some reason this superb photo i have located will not load but on post preview it is there :confused:


Edit by Mick:- pic attached.

Jatcosolenoids.jpg

You do not have the required permissions to view the files attached to this post.

Posted 04 Feb 2012, 09:45 #49 

Last edited by takestock on 04 Feb 2012, 09:58, edited 3 times in total.

User avatar
Bermudan 75
I have a copy of the Jatco JF506E parts diagram from Automatic Choice and this:
Autobox( diesel ) solenoid Replacement

--------------------------------------------------------------------------------

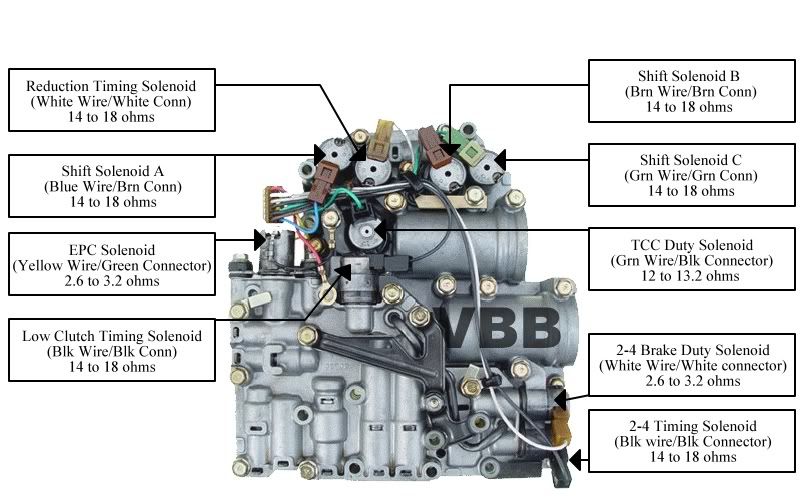
First job is to make sure you do really need to do this job. So get hold of a multimeter with resistance facilities and twist open the large cylindrical connector on the passenger side of your engine bay. There are two there , its only the large one that concerns you. Test resistances accros the male pins side of the connector. They should match FIGURE 6 in this document http://www.muddyoval.com/1articles/f...20Part%201.pdf
So you should have found one or more of your solenoids faulty,,, its time to go in !
On hand you need At least 1litre of the correct ATF 5 litres if you plan to drop the oil at the same time, the solenoid/s you beleive are faulty and ideally some gasket goo. A 10mm ratchet setup for cover bolts and ideally a 10mm ring spanner 8mm socket to move coolant header tank. Flat head screwdriver for air pipes,cableties to tie them back temporarily.I found a butter knife and hammer usefull for breaking the cover seal.
Ok so to start make a bit of room for yourself above the black solenoid cover . I undid the jubilee that joins the intercooler pipe to the EGR (Exhaust Gas Recirculation Valve)/the jubilee that joins the large silicone intercooler pipe to a metal pipe just above the casing and moved the coolant header tank off to the left, dont worry about keeping it level. Cable tie anything else back there are some plastic sheathed wire looms down there and some coolant pipes.
Now you can start undoing the 20 10mm bolts surrounding the cover. You will have to access some from underneath .When all thats done you will most likely need to drive a butterknife or similar impliment behind the cover at various points just to loosen the seal and enable you to remove the cover. Be carefull at this point as oil will come out from the solenoid chamber even if you have dropped it from the drain.
Ok cover off you refer to this document and locate your faulty solenoids whereabouts http://www.automaticchoice.com/Catalogue/jf506e.pdf Exploded component diagram on page 448 shows solenoid locations list on 450 shows which solenoid it is in relation to diagram i.e 708 is 2/4 duty solenoid. You can now unbolt solenoid and replace carefully, make sure not to introduce any Foreign object debris into the gearbox.
Now clean the face of the cover and wipe the oil from the box flange . Bead of liquid gasket around the cover and bolt it back on . Top up your oil if needed and away you go .Replace all your air hoses etc and your done.
Image

Posted 04 Feb 2012, 09:48 #50 

User avatar
takestock
Anybody gonna go and see if He is under a pile of snow.............
Photobucket = Tossers

Dave....

Posted 04 Feb 2012, 18:10 #51 

User avatar
Bermudan 75
Am presently getting everything together to change the solenoid, however I can't seem to find a picture anywhere of the filler plug for the autogear box. I have looked in Haynes and the MGR workshop manual, no luck. Anyone know where it is?
Image

Posted 05 Feb 2012, 11:57 #52 

User avatar
Mick
(Site Admin)
Here you go Mike, it's one of our Know How documents. engine-and-technical-browse-available-pdf-s.html then JATCO Automatic Transmission Fluid Refill

Posted 05 Feb 2012, 12:08 #53 

User avatar
Bermudan 75
Thanks Mick, am now proceeding with the operation,, (England 31-0).
Image

Posted 05 Feb 2012, 13:00 #54 

User avatar
Mick
(Site Admin)
Rover418275 wrote: (England 31-0).


Long way to go yet, keeping fingys X'd

Posted 05 Feb 2012, 13:07 #55 

User avatar
Bermudan 75
Have got the cover off and only about an egg cup or two of transmission fluid came out. The car is on front wheel ramps so in this atitude would most of the fluid flow away from the cover?

The fluid was only changed on Monday by ex-Rover guys.
Image

Posted 05 Feb 2012, 15:00 #56 

User avatar
Bermudan 75
Changed solenoid and gear change now as it should be, however took car for a road test and it lacks power, struggles to get to 2500 revs, no kick down and when parked up revs only just get to 3000.

Any ideas?
Image

Posted 06 Feb 2012, 17:00 #57 

User avatar
takestock
congratulations on the solenoid :) no idea on the other. check connections on the plugs you have disturbed, battery off reset. otherwise T4 (Testbook version 4.Computer Diagnostic System) ...
Photobucket = Tossers

Dave....

Posted 06 Feb 2012, 17:06 #58 

User avatar
Bermudan 75
takestock wrote:congratulations on the solenoid :) no idea on the other. check connections on the plugs you have disturbed, battery off reset. otherwise T4 ...


Can't see anything that I might have disturbed, the only connector I opened was the one to check the solenoids.

Would the battery being disconnected for 24 hours cause any problems?
Image

Posted 06 Feb 2012, 19:01 #59 

User avatar
Duncan
Shouldn't do. The ECU (Engine Control Unit) learns the engine a bit, but not so much it would cause symptoms like yours.

EDIT:
You were working quite close to the intercooler pipes. Maybe one has come off? The massive air leak would give major performance problems.
Image

Posted 06 Feb 2012, 19:05 #60 


Top

cron